Do you know how to breathe correctly?
The question seems almost non-sensical, like asking if you know how to blink. But, the way you breathe while sitting at your desk is much different than how you should breathe while on a run, or when you squat with 300 pounds on your back. And, we’re not just talking about breathing heavier as you get tired.
Your breath is far more powerful than you think because breathing is so deeply tied to many essential structures of your body, including your spine and ribcage. It might seem impossible, but the way you breathe can do everything from preventing back pain to make you significantly stronger on squats, deadlifts, presses, and almost every exercise imaginable.
Before you complete another workout, it’s time to find out if you’ve been breathing the wrong way, and what you can do to make a small change that leads to incredible results.
The Power of Your Breath
Most fitness tips do not provide instant gratification. It takes a lot of reps and sets, sometimes across a span of years, to change your body.
And while no workout will instantly slash fat or make you more muscular, there are a few techniques that, like magic, can have an immediate impact on how well you train and feel. The Valsalva maneuver, which is a way of breathing, is one of those techniques.
Part of the reason it has such a dramatic impact is that for the majority of people, how to breathe when you exercise is completely overlooked.
When you learn about training, almost everything focuses on the usual suspects:
- How much weight you’ll use
- The reps and sets
- The exercise selection
- What equipment to use
All of these are important parts of training and exercise. But, all of these cover what you do. They tend to avoid how to do it.
While there’s no shortage of exercise explanations you can find online, it’s rare that tips on correct form provide a detailed explanation of how you should breathe.
But, the way you breathe on different exercises can make all the difference between staying pain-free and seeing more progress. Enter the Valsalva maneuver.
To understand how and why this technique is the key to no back pain and lots of strength gain, it’s time for a quick test.
The Soda Can Test: How to Know Your Spine is Safe
To understand why learning how to breathe properly is important, all you need to do is think about a soda can. When it’s pressurized and sealed, it’s very strong. You can stack several bricks on top of it and it won’t budge. But, if you open the can and let that pressure escape, the weight would crumple the can underneath.
Think about breathing in the same way: do it right and you’re unstoppable, do it wrong and you get crushed.
Correct breathing can make every exercise a safe and effective movement. Think about it: No one argues whether exercise is “good” for you, but plenty of people debate whether certain exercises should be avoided because of the risk of injury.
For example, you might know the squat as one of the best exercises for developing strength and building muscle. Or, you might think of it as an exercise that causes back pain. That alone means that plenty of you avoid squats (or avoid doing them with added weight) when, in reality, it’s not the exercise that’s the problem; it’s how you’ve been taught to do the movement.
“Everybody tells you to inhale on the way down, and exhale on the way up,” says Mark Rippetoe, owner of the Wichita Falls Athletic Club and author of Starting Strength: Basic Barbell Training. “That is complete and utter BS. If you do that, you will hurt yourself.”
Now, Rippetoe isn’t suggesting you shouldn’t breathe. What he’s saying is that the typical breathing cue is incomplete and leaves out many vital details. And that if you’re just breathing — and not practicing the Valsalva maneuver — then you’re at risk.
“When you Valsalva, you’re protecting your spine,” says Dr. Belisa Vranich, clinical psychologist and author of Breathe: The Simple, Revolutionary 14-Day Program to Improve your Mental and Physical Health. “Most people don’t understand that you have to take a big breath in to be able to protect your spine [when you lift].”
When you inhale deeply, you create what’s called intra-abdominal pressure. The term describes forces within your abdominal cavity or the area surrounded by the muscles on the side of your abs (your obliques), your pelvic floor (on the bottom), diaphragm (on top), rectus abdominus (the area known as the six-pack), and several back muscles.

When you have a heavy load on your back, this pressure is your friend. It’s no different than the soda can.
WIthin your abdomen, the pressure you create with a deep inhalation helps keep your spine rigid and stable.
“Air is support to the back,” Rippetoe says. So the way you should lift when you squat is to inhale deeply and brace your torso, hold that breath (and bracing) on the way down, then either continue to hold it on the way up or exhale through pursed lips when you hit the most challenging part of the lift.
Before you try the Valsalva maneuver, there’s something you should know: in order for it to work for you, you first have to master an even more fundamental skill.
Are You Breathing Well? (Here’s How to Find Out)
Consider this Breathing 101. Because you know how to breathe, it will be quick. But, if you want the Valsalva maneuver to work, then you need to make sure you’re breathing correctly.

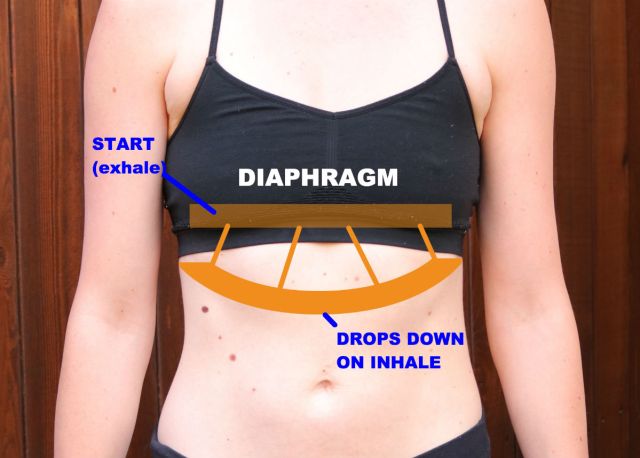
To understand how you breathe, it’s important to visualize your diaphragm as two separate parts.
Your diaphragm divides your insides into an upper (thoracic) cavity and a lower (abdominal) cavity. Think of it as the muscle that powers breathing. When you inhale, your diaphragm pushes downward against your abs, drawing air into your lungs and creating more space for them within your body.
“The lungs will fill like a vacuum once the diaphragm drops downwards,” explains Dr. Kathy Dooley, a chiropractor and anatomy instructor based in New York City.
However, a number of things, such as bad posture, can prevent your diaphragm from doing its job effectively.
“When your abs are gripping your diaphragm, it will not let you take a big inhale,” Vranich says. “If you go to take a big inhale, you’ll have to take it with your shoulders because your diaphragm is being squeezed.”
So what should it look like? If your belly moves outward when you breathe in, it’s a sign that your diaphragm is working correctly. It might make you feel self-conscious because it will look like you’re creating a gut, but you’ll feel and perform a lot better.

On the flipside, consider what happens when you don’t breathe correctly. The result looks something like:

This is known as “vertical breathing.” And it achieves the biologically necessary goal of getting you oxygen (because, ya know, you still need to breathe and your body won’t let that not happen). But, it creates a host of other problems.
The Risks of Poor Breathing
If you’re a vertical breathing, it can be a literal pain in the neck. That’s because this type of breathing tightens the muscles in your neck and shoulders. If you have your massage therapist on speed dial, vertical breathing may be why.
This style of breathing doesn’t deliver oxygen as well as a diaphragmatic breath, so you’ll have to inhale more frequently, which can elevate your blood pressure, pulse, and level of anxiety.
Even crazier? Your diaphragm attaches to your spleen, liver, and small intestine, and doing it wrong can cause a domino effect of health problems.
“If you’re breathing up with the chest, you may not be creating the ‘massage’ for your lower organs to encourage your smooth muscle (tissues in the gut) to act like it should,” Dooley says. “You’d be surprised by how much breathing affects your gastric emptying, and how much breathing affects things like IBS (irritable bowel syndrome).”
And then, of course, there’s how bad breathing affects your ability to use the Valsalva maneuver.
If you’re breathing “up,” using your chest, shoulders, and other muscles to pull air into your body, you can’t create the type of intra-abdominal pressure that will protect your spine when you lift—even if you took in the biggest breath you possibly could.
“If you’re building good intra-abdominal pressure, you don’t necessarily need to raise your chest upwards [when you inhale],” Dooley says, who adds that the reverse is also true: If you’re raising your chest upwards, you’re not building good intra-abdominal pressure.
Here’s a simple way to tell whether you’re using your diaphragm well. Look in the mirror and watch yourself breathe. If your chest and shoulders are moving up and down in a way that looks like the illustration above, you have some work to do.
How to Breathe Better (And Lift Weights Better Than Ever)
Here are 3 exercises that can help you breathe better and keep your shoulders down.
Breathing Exercise #1: Diaphragm Extensions
While Vranich teaches several techniques, perhaps the simplest method is an exercise that requires you to lie on your back and just breathe. (Yup, it’s really that simple.)

To perform the move, lie flat on your back and place any light object—it could be a book, a pillow or whatever you have handy—on top of your belly button. Rest your hands at your sides and cast your gaze slightly downward, so you can see the book somewhere in your field of vision.

Inhale deeply into your belly, raising the book as high as you can. When you exhale, watch the book lower. Keep breathing in this manner for a few minutes.
Vranich recommends you don’t worry about your pace of breath at first, just notice how breathing into your lower body feels. You may find that performing the technique slowly brings a sense of calm.
That’s because slow, controlled breathing initiates a “rest and digest” response from your body called the parasympathetic nervous system. For this reason, you may want to try breathing in this manner before bedtime, or even at the end of your workouts (when it can help bring your heart rate and signal to the rest of your body that it’s time to chill).
To start, try using it for a minute or so at the front of a training session to teach (or remind) you of how diaphragmatic breathing feels.
Breathing Exercise #2: The 90-90
As the name suggests, the “90-90” indicates that you’ll have a 90-degree bend in your hips, and a 90-degree bend in your knees. And you’ll need a Swiss ball.
Lie on the floor, place your heels atop the ball, and adjust your feet so that you have those right angles at your hip and knee. Dooley shows you how to set up for the exercise in this video:
The object is to inhale into your lower abdomen. Rather than just trying to press upward with the belly, think about filling the whole abdomen in every direction. When you inhale, your abs, your obliques, and the muscles in your lower back all should press outward.
“What we’re looking for is for the abdomen to fill in 360 [degrees] on the inhale,” Dooley says. “These muscles all around you are muscles of exhalation, therefore they need to expand when you inhale to build proper intra-abdominal pressure.”
Stay in the 90-90 until you feel like you’re getting the hang of breathing with all of those muscles, or for as long as your workout will allow. If you typically don’t have a whole lot of time to train, don’t worry about it. Even a minute will be helpful.
Breathing Exercise #3: The Dead Bug (AKA Dying Bug)
This exercise takes the good intra-abdominal pressure you’ve learned and applies it to moving your arms and legs.
To set up for the move, you’ll lie on your back with your hips and knees bent 90-degrees. (No Swiss ball for your heels this time.)
You can hold your arms straight overhead, or press them against your abdomen to feel the pressure you’re creating. Inhale, then exhale slowly as you lower the heel of your left leg to the floor, lift it back to your starting position, then lowering and raising the heel of your right leg.
You’ll do all of this (moving both legs down and back up) on a single exhale, maintaining stiffness in your core as you move. Once you’ve completed the movement with both legs, inhale and repeat. Perform 5 to 10 reps, where moving your left and right leg is one rep.
“This is a fantastic drill for learning how to build intra-abdominal pressure and build core stiffness but ambulate the limbs,” Dooley says. “It has a lot of carryover into things like squatting and deadlifting because you’re trying to maintain core stiffness and abdominal stability while you’re trying to ambulate the limbs.”
How to Valsalva Maneuver Like a Pro
If you know how to breathe deeply into your lower abdomen, then the first cue of the Valsalva is pretty simple.
“Big breath in,” Rippetoe says. “Before every rep, take a big breath.”
Just as you did when you performed the Supine 90-90, the breath should fill your lower abdomen in every direction. That’s half of the battle.
The other half is bracing properly. Here’s where the work you did in the Dying Bug comes into play. You want to engage your abs, your obliques, and the muscles in your back, holding them all stiff as you start your descent downward. Exhale when you reach the top. Then inhale and repeat.
As with anything, the little details matter. The Valsalva maneuver is not something you want to hold throughout a set. Exhale after every rep. Then, inhale and reset before your next rep.
One of the knocks on the Valsalva is that it elevates your blood pressure, which most of us tend to think is a bad thing. And it is, but only if your high blood pressure is chronic. In other words, if you walk around every day with a systolic/diastolic combo that’s well above 120 over 80, then you’ll want to consult with your doctor.
But, the blood pressure lift from the Valsalva is temporary—when you perform it, the pressure goes up. When you stop, it returns to baseline.
However, if you have a known risk factor like an intracranial lesion, then yes, you should speak with your doctor before trying the Valsalva maneuver. Same if you have hypertension that you haven’t addressed. As with anything, exercise common sense and communicate with your doctor if you have any concerns.
READ MORE:
How Low Should You Squat, Really?
The Truth About the 7-Minute Workout
The Tension Weightlifting Technique: How to Make Every Exercise More Effective