Here, we will comprehensively elaborate on how to screenshot on your Windows computer, where computers operating on Windows 8 and 10 can work with a keyboard shortcut to take and save a full-screen screenshot automatically. Additionally, all Windows versions significantly support taking a full-screen screenshot with the “Print Screen” key. Other methods like working with the Snipping Tool to take a custom screenshot and take a screenshot on a surface are equally effective.
How to take a screenshot on Windows 8 and 10
If you really need to capture the entire screen or simply take a screenshot, Windows 10 provides a variety of methods for taking a screenshot. Begin by proceeding to the screen that you want to screenshot, and before you can take a screenshot, ensure that the screen you want to screenshot is up with zero distractions like, for example, open programs or windows.
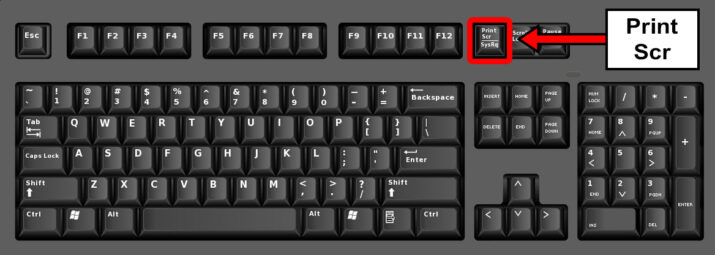
Photo: hellotech.com
Next, locate the “Print Screen” button on your keyboard, which is most frequently found in the upper-right side of the main keyboard, that is counting the number pad if your keyboard contains one and it commonly has “SysReq,” short for “System Requirements” indicated below it.
Essentially, the Print Screen button will commonly be abbreviated to “PrtSc” or something similar. Afterward, press the Windows button and the Print Screen button simultaneously since in doing so, it will take a screenshot of the screen you are on at the moment, and in most cases, you will observe the screen doing briefly.
Keep in mind that your screen will not dim if your PC has particular display settings disabled, and it is most common in old or outdated computers on which you upgraded to Windows 10. Suppose your screenshot does not come up when you search for it; attempt pressing the Ctrl+Windows+Print Screen key simultaneously or Fin+Windows+Print Screen keys at the same time.
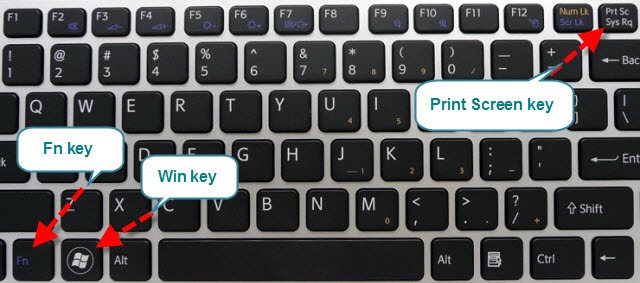
Photo: Screenshot.net
Then, locate the screenshot, and you will find the screenshot inside the “Screenshots” folder, which is found in your computer’s “Pictures” folder. Each screenshot that you take will read “Screenshot (number)” to match with the order in which the screenshot was taken. For instance, the first screenshot you take will read as “Screenshot (1)”, etc.
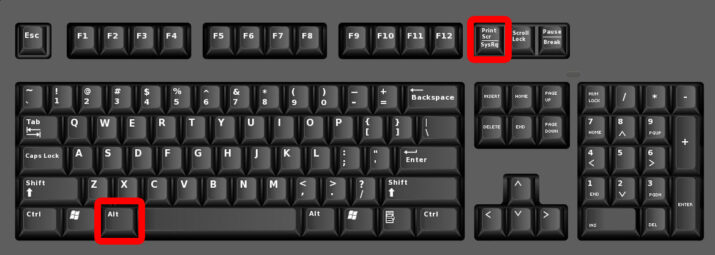
Photo: hellotech.com
Additionally, the Alt+Print screen is used to screen capture the only active window you are working in and copy it to your clipboard, press Alt+PrtScn where you will need to paste it into another program to successfully save it.
How to screenshot on Windows Computer
Begin by heading over to the screen that you want to screenshot, and before you do so, ensure that the screen you want to screenshot is present with absolutely no distractions like open windows and programs. Proceed to thumb the Print Screen button, which is typically located in the upper-right side of the keyboard, the right row of the “Function” keys like F12 at the top of the keyboard.
Thumbing the Print Screen button will take an image of your entire screen’s contents. Keep in mind that the Print Screen button may be labeled as “PrtSc” or something similar, and if your computer has an Fn button on the lower-left side of the keyboard, you may need to press the Fn and Print Screen simultaneously.
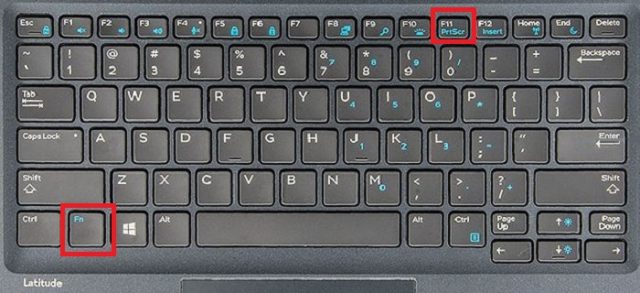
Photo: techadsbook.com
Next, open Paint, which comes installed on all Windows computers. To open it, begin by opening Start, and on Windows 8, open Search, where you will tap the search bar at the bottom of the Start menu. Proceed to type in Paint and click Paint at the top of the Start Window, where on Windows 8, Paint will appear in the search results.
For a Windows XP computer, tap Start, select Programs, select Accessories, and tap Paint. Proceed to paste in the screenshot, and immediately the Paint window opens, thumb Ctrl+ V to paste in the screenshot. You should automatically see the screenshot come up in the Paint window. Save the screenshot where you will thumb the Ctrl+ S, key in a name for your screenshot, choose a save folder on the left side of the window, and tap Save.
How to take a One Window Screenshot
Click the window that you prefer to capture a picture of where the One-Window screenshot function will normally take a picture of the “active” window on your current screen, which signifies that it should be right in front of all your other windows.
Hold down Alt, thumb the Print Screen key where a picture of the window will be copied to the clipboard, and the dimensions of the picture will be determined by the size of the window when the screenshot is taken. You will not get any confirmation that the screenshot has been captured. Open Paint is the program that comes installed on all Windows computers.
To open it, open Start, where on Windows 8, you will open search where you will click on the Search bar at the bottom of the Start menu and type in Paint. Next, tap Paint at the top of the Start window, and on Windows 8, Paint will come up in the results.
For a Windows XP computer, tap Start, then select Programs, Accessories, and tap Paint. Proceed to paste in the screenshot, and immediately the Paint window finally loads, thumb the Ctrl + V keys to paste in the screenshot where you should see it come up in the Paint window.
Additionally, you can also paste the screenshot into other programs like Word or the body of an email. Open the program that you want to paste the picture into and press Ctrl + V keys. Immediately save your screenshot as an image file, then clicking File, Save, entering a name, tap a location on the left side of the page, and tap Save.
You can immediately change the screenshot’s file type by tapping the “Save as type” drop-down box at the bottom of the window and then clicking a different format like JPE in the drop-down menu. The most common types are PNG and JPG; the most recommended format for screenshots is PNG because of the small file size and high quality.
How to screenshot on Windows using a Snipping Tool Program
Start by opening the Snipping Tool, which is a screenshot tool that is available in all versions of Windows Vista 7, 8 and 10 except the Starter and Basic editions, and it is not available in Windows XP. In Windows 7 and Vista, tap the Start key, select All Programs, select Accessories, and select the Snipping Tool from the list.
As for Windows 8, begin typing “Snipping tool” while on the Start screen and choose it from the search results; while in Windows 10, tap Start, type in “Snipping Tool,” and select Snipping Tool from the results.
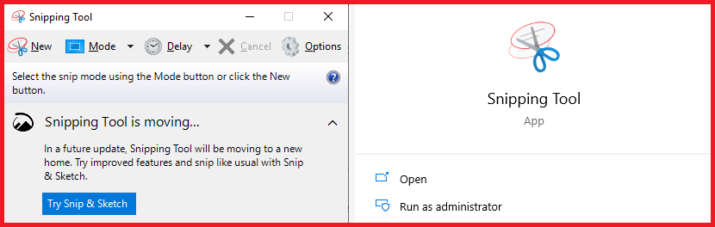
Photo: https://openport.net/
Decide the shape of the Snip where the “Rectangular Snip” is chosen by default. Proceed to tap the arrow key next to the Mode key to change the Snip shape. Ideally, free-form Snip lets you draw any shape with your mouse where the area inside the shape will be snipped.
The Rectangular Snip allows you to select a rectangular area that will be snipped, and on the other hand, Window Snip allows you to choose a window to snip. Essentially, full-screen Snip snips the entire screen, with all windows included, except the Snipping Tool window.
Proceed to adjust the Snip border, where by default, any snip you make will contain a red border around it. You can change or disable this by tapping the Tools tab in the top-left side of the Snipping Tool toolbar, choosing options from the drop-down menu, and unchecking the box next to “Show selection ink after snips are captured,” which will eliminate the border from any future snips.
Go ahead and create a real new snip by clicking the New button to begin the selection. The screen will eventually fade, and you can draw your Snip area or select the window if you decide on Window Snip. Release the mouse when choosing to create the Snip, and if you had full-screen snip selected, your Snip would immediately be created once you tap on New.
Proceed to annotate the snip, then immediately you create the Snip, it will open in a new window. You can work with the Pen tool to draw on it, make notes, and work with the Highlight tool to significantly draw attention to the text. The Erase tool will exclusively erase annotations, not the screenshot itself.
Once you are done, save the snip by clicking the floppy disk icon to open the save dialogue. Key in a name for the screenshot and change the “Save as type” field if desired, and you can now send the screenshot by email or put it on a website. PNG is the default format in Windows 8 and 7, and it is a lossless compressed format that means that it will take high-quality screenshots at small file size.
It is the most recommended format for capturing screenshots. JPG or JPEG is normally the default format in Windows Vista, a lossy format signifying that the screenshot will appear slightly blocky, and it is primarily designed for photographs and highly discouraged for screenshots.
GIF is unstable for reproducing color photographs; however well suited for images like logos or graphics with solid areas of color. Copy the Snip where, by default, the Snip is copied to the clipboard where you create it, which means you can paste it into Word or Paint, much like you would with a full-screen screenshot.
In Paint, you are allowed to make more edits than you can in the Snip annotation editor, and to successfully paste the Snip in this screenshot tool, open a window that fully supports pasting and thumb the Ctrl+V keys simultaneously.
How to screenshot on Windows using the Snipping Tools shortcut
You can easily do this by going to the page you want to screenshot and then opening the screen or program you want to take an image of. Go ahead and press Windows+Shift+S keys simultaneously since, in so doing, you will cause your screen to turn light-grey eventually, and your mouse will automatically then into a crosshairs icon.
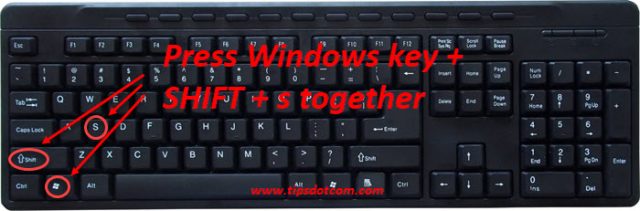
Photo: https://www.tipsdotcom.com/
Choose the area to screenshot to click and drag your mouse from the top-left corner of the area that you want to capture a screenshot of to the bottom-right corner. For instance, if you want to take a screenshot of your entire screen, you should click and drag your mouse from the top-left corner to the bottom right corner of the screen.
Go ahead and release the mouse button, which will both capture a screenshot of your selected area and automatically save it to your clipboard. From this point, it can be pasted into any program that accepts pasted images.
Paste your screenshot by opening any program that fully supports pasting in pictures such as Word and Paint, then press Ctrl+V simultaneously. Once you have completed, you can save your screenshot’s document by thumbing Ctrl+S, keying in a name, select a save location, and tap on Save.
How to screenshot on windows using the game bar windows
Here, the Windows Key+G automatically opens the game bar, which consists of an icon resembling a camera in its broadcast and capture section. Click on that, and your screenshot of a specific image is saved to the Videos/Captures under your primary user folder.
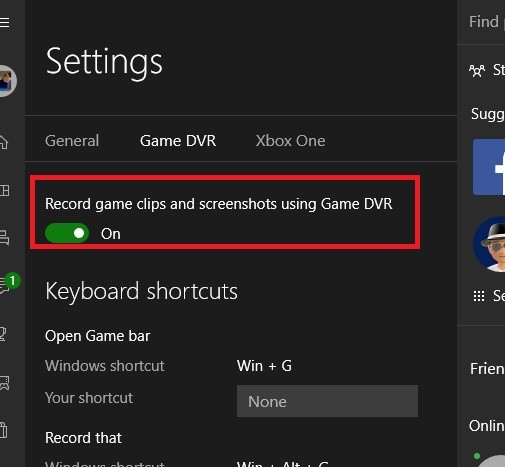
Photo: https://mywindowshub.com/
Also, if you want to screen record, you can use the game bar by pressing Windows key+G and also third-party apps provide even more features like automatically uploading the screenshots to the internet.
How to take a screenshot using the keyboard shortcuts for print screen

Photo: https://www.bestmonitorshz.com/
You may use the keyboard shortcut which is Windows Logo Key+PrtScn key as a shortcut for the print screen. This whole process of taking screenshots is supported by Microsoft for mostly Windows 10 as a shortcut and if your device does not have the PrtScn key, you may use the FN+Windows logo key+Space bar to take a screenshot. To find your screenshots, open File Explorer from the taskbar. On the side navigation pane, choose the Pictures folder, and choose Screenshots.
How to screenshot on Windows using Windows Tablets

Photo: https://www.isumsoft.com/
You can do this by opening the screen you want to screenshot, and before you can take a screenshot, you must ensure that the screen you want to screenshot is present with zero distractions like open programs or windows. Thumb and hold the Windows logo, which is on the tablet’s bezel, not the Windows key on your desktop, and if there is no Windows key on the tablet, then press the Power key.
Next, press the Volume Down button or Volume Up if you are working with the Power button. The screen will dim slowly to indicate a screenshot was captured. Your screenshot will automatically be stored in the Screenshots folder, which you can easily access by Opening File Explorer and finding your way to Pictures, then Screenshots.
Like this Article? Subscribe to Our Feed!
Author: DLM Editor
Life tips and life hacks for happiness and prosperity.