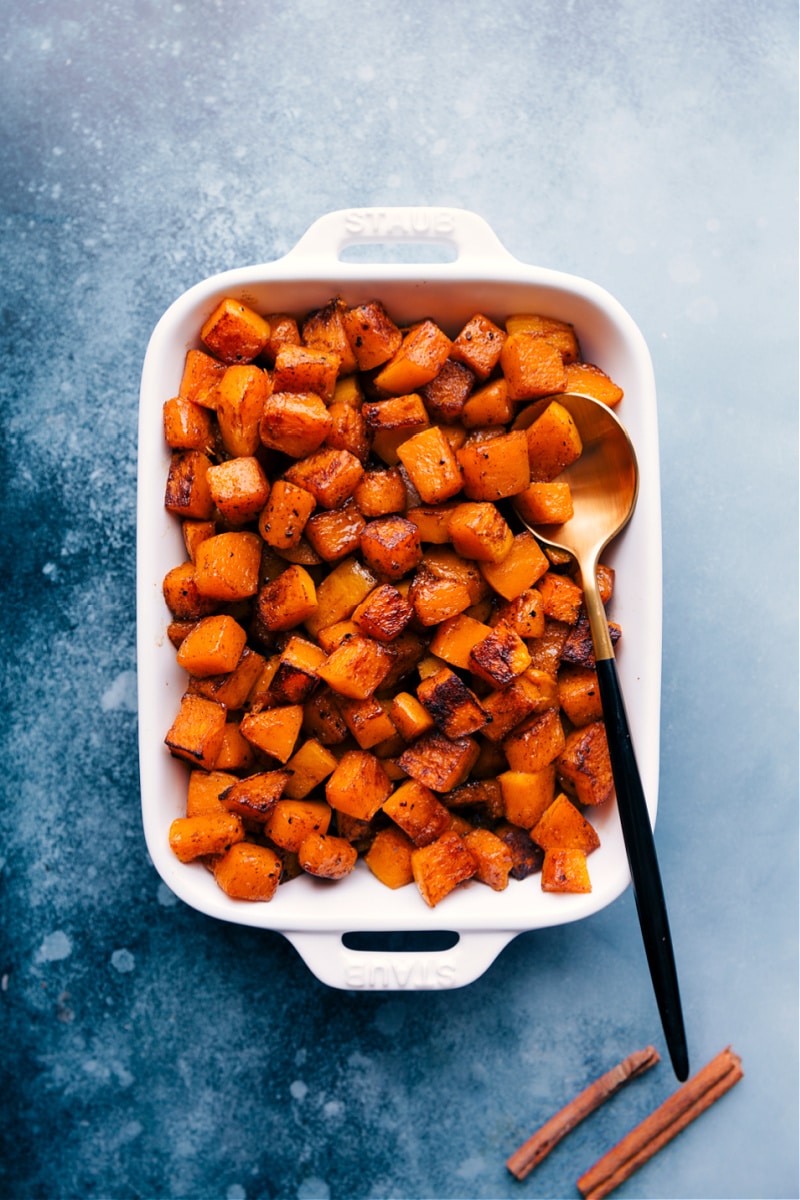
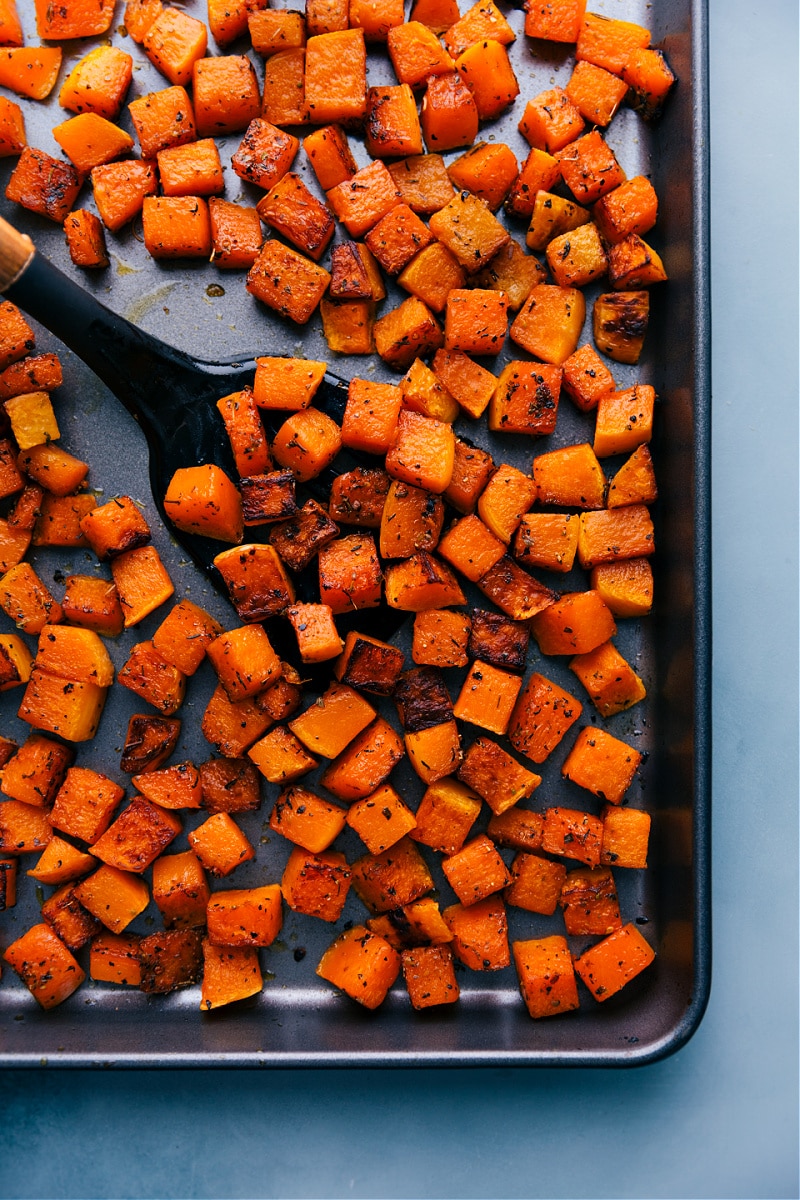
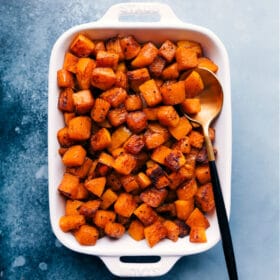
Roasted Butternut Squash is simply the best! With beautifully caramelized exteriors and tender sweet interiors you’ll be hooked after one bite! This post shares all about how to find the perfect squash, how to prepare it three different ways, and how to store/reheat it later!

One Butternut Squash, Three Recipes!
Butternut squash is a favorite in my home so we’ve experimented with it plenty over the years! There are so many different ways to prepare butternut squash, but roasting it is hands down the favorite! The high heat from the oven gives the squash a beautiful caramelization and brings out the natural sweetness of the squash. The texture becomes unbeatable with a soft tender center and slightly crisp exterior.
Depending on how you’re using this roasted butternut squash we’ve got three different ways for how to prepare it. If you’re roasting squash to use in a different recipe or are looking for the purest butternut squash flavor, we recommend the “basic seasoning blend“. For a savory & hearty side dish that can stand on its own, we recommend the “savory seasoning blend.” This blend is similar to the basic, but with a few additional seasonings added in that nicely compliment the squash flavor. And if you’re looking for a sweeter side dish that is sure to win over just about anyone, we recommend the “sweet” recipe which combines cinnamon, maple syrup, and brown sugar creating a side dish that could practically pass for dessert!
Shopping For And Storing Butternut Squash
Before we start on making roasted butternut squash, let’s chat about how to pick out the perfect squash and how to prepare it
Look for a uniformly beige color (the darker the shade of beige, the better!), squash should be free of cuts and blemishes
Avoid green patches and shiny skin (opt for matte skin instead)
Choose a squash that feels heavy for its size and sounds hollow (if you give the squash a tap, it should sound hollow)
Storage: if you aren’t using the squash right away, keep it at room temperature (left whole, raw, and unpeeled). Keep it in a dark and cool place. If you have peeled and chopped it, keep the cubes in an airtight container in the fridge.
Recognizing when a butternut squash has gone bad: any changes in texture or an “off/funny” smell are good indications the squash is no longer good. If there are white specks or mold on the surface, it’s no longer good. Once you’ve got roasted butternut squash you can tell it has gone bad with an “off/funny” smell or sliminess on the surface.
Tools That Are Nice To Have
Roasted butternut squash is easy to make, but cutting a squash can be tricky. That said, with the right tools, it’s much easier (and safer!) Here’s what we recommend:
- Vegetable peeler: we’ve found it’s much easier to peel the squash as opposed to cutting off the peels.
- Solid cutting board: it’s important to use a sturdy nonslip cutting board when working with the squash.
- Sharp chef’s knife: the better the knife, the quicker and easier the cutting will be. The sharper the knife, the safer it is to cut (less risk of the knife sliding off the squash and cutting you!)
- Large baking sheet: the larger the sheet pan, the more evenly the squash will roast. If the squash cubes are overlapping or too closely spaced, they’ll steam instead of roast. We love this 15×21-inch sheet pan best for preparing roasted butternut squash.

QUICK TIP
If you don’t have a good cutting board or chef’s knife, you may want to roast the butternut squash whole instead — like Jamie Oliver does in this recipe!
Roasting Tips
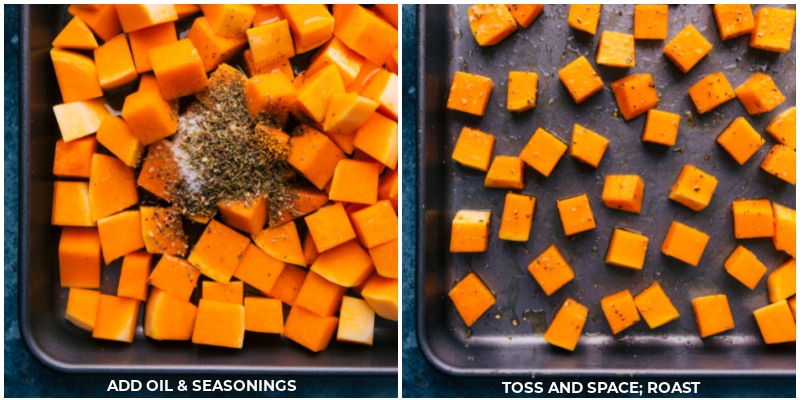
- Space out the squash. On a large sheet pan, spread the squash into one even layer giving the squash cubes as much room as possible. If the squash is crammed, it will end up steaming instead of roasting which yields a softer texture with less caramelization.
- Toss often. To get that beautiful caramelization on all sides of the butternut squash, we recommend gently tossing the squash 2-3 times throughout the roasting process.
- Taste and adjust. As with all recipes, be sure to give a roasted butternut squash cube (or two) a taste before serving. You may find it needs an extra pinch of salt and pepper to really bring the flavors to life.
- Dice the squash into even cubes — the more even your pieces, the more perfectly the squash will roast!
STORAGE
Storing Butternut Squash
- Whole (uncooked) squash should be stored in a cool, dark area to prevent ripening. A fresh squash can last 1-3 months depending on the ripeness when purchased.
- Cut (uncooked) squash needs to be stored in an airtight container in the fridge for 1-3 days depending on how firm/fresh it is. Alternatively you can freeze it: spread out the cubes on a parchment-lined sheet pan in one layer and freeze until solid. Remove the sheet pan, transfer to an airtight container or bag and return to the freezer. Store in the freezer for up to 3 months.
- Cooked roasted butternut squash can last in an airtight container for 4-5 days. Alternatively it can be frozen (follow directions above for freezing). To reheat, add cubes to a skillet and heat over low heat until warmed through. Alternatively warm through in the microwave or 350 degree heated oven until warmed through.
Roasted Butternut Squash FAQs
1Do I need to peel butternut squash before roasting?
While you can technically eat the skin of a roasted butternut squash, the texture isn’t ideal — it’s tough!
For this recipe, we highly recommend peeling the squash before cutting and roasting.
To peel the squash, we recommend a good-quality (sharp) vegetable peeler.
2How do I cut a butternut squash?
With its odd shape, cutting a butternut squash can be an intimidating task!
But with a few good kitchen tools you might find it’s easier than it seems!
- Rinse the squash under cold water to remove any dirt or debris.
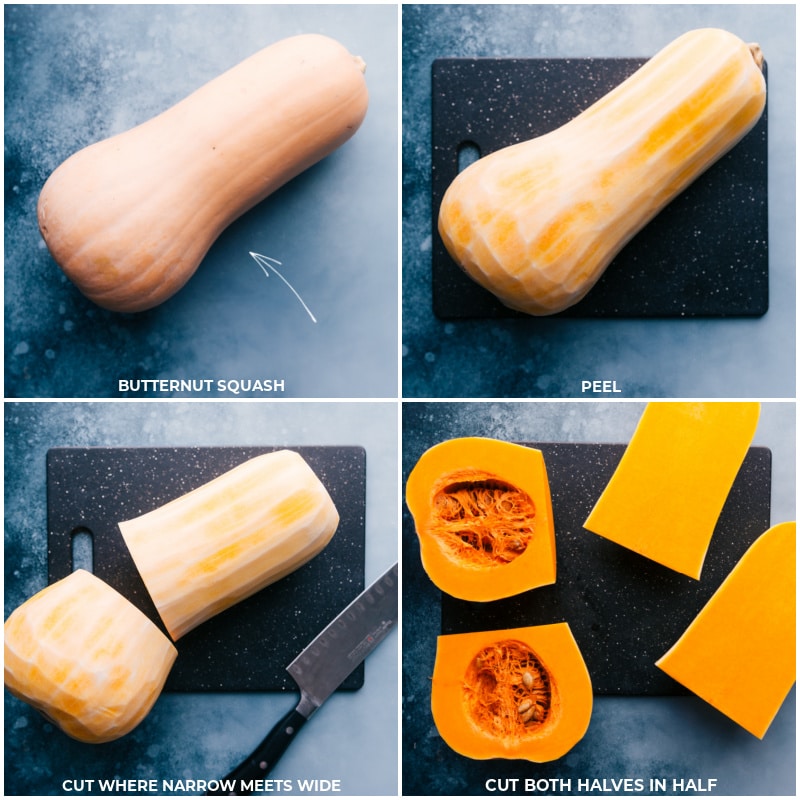
- Use a sharp vegetable peeler to peel the entire squash. If you don’t have a peeler, cut the squash in half where the narrow section meets the wider round base. Use a pairing knife to vertically slice off the peels.
- Place the squash on a firm and heavy duty cutting board. Using a very sharp chef’s knife (the sharper the knife, the easier it will cut!) and cut off the top stem and about 1/4th an inch from the bottom.
- Cut the squash in half (crosswise) where the “neck” meets the wider, base end section. Now cut each section in half again, right down the middle to get 4 pieces.
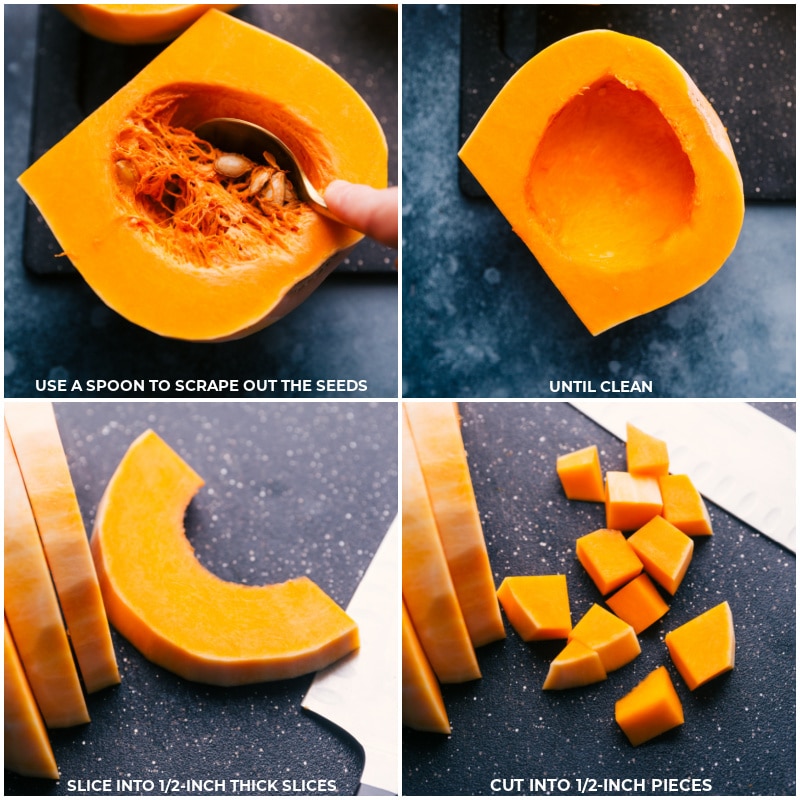
- Use a spoon to scrape out all the seeds and stringy parts from the two insides of the base of the squash. You can save the seeds and roast them — more on this later!
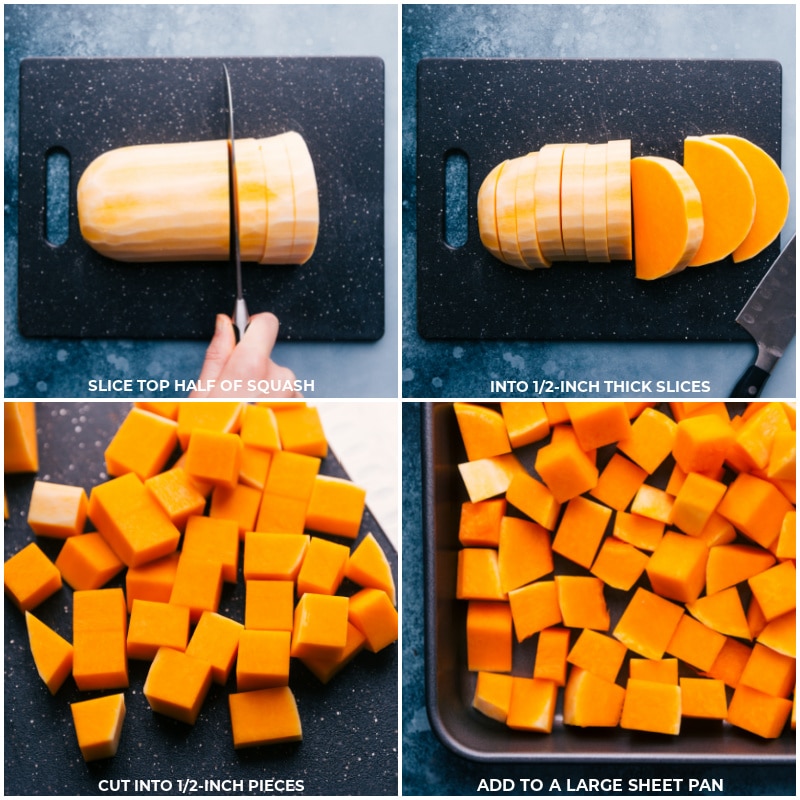
- Lay each of the halves cut side down and then cut each half into 1/2-inch pieces. Cut these half moon pieces into 1/2-inch cubes.
- Aim for even-sized pieces as much as possible, but it’s okay if not each of the cubes are in a perfect square, they’ll all taste delicious!
3How do I roast butternut squash seeds?
- Wash and throughly dry the seeds, separating out all the stringy parts. Preheat the oven to 275 degrees F. Line a large baking sheet with parchment paper.
- Measure to get 1 cup of seeds. Add to a bowl and toss with 1 tablespoon olive oil and 1/4 teaspoon fine sea salt (or to taste). You can also add in some cinnamon or other spices here! Toss to coat and then spread in an even layer on prepared sheet pan.
- Bake for 15 minutes or until seeds begin to pop. Remove and let fully cool then enjoy!
4How do I select a ripe butternut squash?
You can tell the squash is ripe by the color and texture of the outer rind/skin.
The skin should be hard, not at all glossy, and an even color. If there are any green spots, it’s not ready to roast!
5What spices pair well with butternut squash?
For a savory-style butternut squash, dried thyme and Italian seasonings pair nicely.
For sweet-style butternut squash, cinnamon, pure maple syrup, and/or brown sugar pairs nicely.
6What do you eat with roasted butternut squash?
Roasted butternut squash pairs nicely with so many meals. It’s excellent paired with a cooked protein like pork, chicken, or turkey.
It makes a great holiday side dish alongside a turkey breast and mashed potatoes!
If you have leftover butternut squash consider adding it to one of our favorite recipes:
7Is butternut squash healthy?
Butternut squash is a great source of fiber, potassium, and other vitamins & nutrients. It is low in calories and rich in antioxidants!

More Vegetable Recipes
Roasted Butternut Squash
Roasted Butternut Squash is simply the best! With beautifully caramelized exteriors and tender sweet interiors you’ll be hooked after one bite!
Roasted Butternut Squash
Roasted Butternut Squash is simply the best! With beautifully caramelized exteriors and tender sweet interiors you’ll be hooked after one bite!
Ingredients
Basic
- 8 cups (2 pounds) butternut squash, peel & cut into 1/2-inch cubes
- 2 tablespoons olive oil
- 3/4 teaspoon fine sea salt
- 1/4 teaspoon pepper
- Optional: fresh thyme
Savory
- 8 cups (2 pounds) butternut squash, peel & cut into 1/2-inch cubes
- 1 tablespoon pure maple syrup Note 1
- 2 tablespoons olive oil
- 3/4 teaspoon fine sea salt
- 1/4 teaspoon each: pepper, dried thyme
- 1 teaspoon Italian seasoning
- Optional: fresh thyme
Cinnamon Butternut Squash
- 8 cups (2 pounds) butternut squash, peel & cut into 1/2-inch cubes
- 1-1/2 tablespoons melted coconut oil
- 1-1/2 tablespoons maple syrup
- 3/4 teaspoon fine sea salt
- 3/4 teaspoon ground cinnamon
- 1/4 teaspoon pepper
- 1 tablespoon light brown sugar, optional
Instructions
-
PREP: Preheat the oven to 425 degrees F (220 degrees C). Grab out an extra large sheet pan (See Note 2) or two smaller ones and set aside.
-
CUT THE SQUASH INTO CUBES: Rinse the squash under cold water. Use a sharp vegetable peeler to peel the entire squash. Place the squash on a firm, heavy duty cutting board. Using a very sharp chef’s knife cut off the top stem and about 1/4th an inch from the bottom. Cut the squash in half (crosswise) where the “neck” meets the wider, base end section. Now cut each section in half again, right down the middle to get 4 pieces. Use a spoon to scrape out all the seeds and stringy parts from the two insides of the base of the squash. You can save the seeds and roast them — See Note 3.Lay each of the halves cut side down and then cut each half into 1/2-inch slices. Cut these half moon pieces into 1/2-inch cubes. Aim for even-sized pieces as much as possible, but it’s okay if not each of the cubes are in a perfect square.
-
BASIC BUTTERNUT SQUASH: On the large sheet pan, add the squash cubes, olive oil, salt and pepper. With your hands, toss to generously coat everything and then spread in an even layer, leaving plenty of space for the squash to roast. (If they’re overlapping they will steam instead of roast and take a lot longer to cook.) Add the tray to the preheated oven and roast for 15 minutes. Remove, flip, and return to the oven for another 10 minutes. Again, remove, flip and return to the oven for another 10-15 minutes or until crisp tender (a fork easily pierces through the squash). Depending on the size of the cubes and actual oven temperature you may need more or less time so instead of solely relying on a time check the squash every time you flip and a few times near the end. If desired top roasted squash with fresh thyme.
-
HERB-ROASTED BUTTERNUT SQUASH (SAVORY): On the large sheet pan, add the squash cubes, olive oil, salt, pepper, dried thyme, and Italian seasoning. With your hands, toss to generously coat everything and then spread in an even layer, leaving plenty of space for the squash to roast. (If they’re overlapping they will steam instead of roast and take a lot longer to cook.) Add the tray to the preheated oven and roast for 15 minutes. Remove, flip, and return to the oven for another 10 minutes. Again, remove, flip and return to the oven for another 10-15 minutes or until crisp tender (a fork easily pierces through the squash). Depending on the size of the cubes and actual oven temperature you may need more or less time so instead of solely relying on a time check the squash every time you flip and a few times near the end. If desired top roasted squash with fresh thyme.
-
CINNAMON-MAPLE BUTTERNUT SQUASH (SWEET): On the large sheet pan, add the squash cubes, melted coconut oil (measure when melted), maple syrup, salt, cinnamon, and pepper. With your hands, toss to generously coat everything and then spread in an even layer, leaving plenty of space for the squash to roast. (If they’re overlapping they will steam instead of roast and take a lot longer to cook.) Add the tray to the preheated oven and roast for 15 minutes. Remove, flip, and return to the oven for another 10 minutes. Again, remove, flip and return to the oven for another 10-15 minutes or until crisp tender (a fork easily pierces through the squash). Depending on the size of the cubes and actual oven temperature you may need more or less time so instead of solely relying on a time check the squash every time you flip and a few times near the end. If desired top roasted squash with fresh thyme.Right out of the oven taste the squash and if you’d like it a little sweeter (it really depends how sweet the squash is initially) add the tablespoon of brown sugar and quickly toss to incorporate. Enjoy!
Recipe Notes
Note 2: Use a Large Sheet Pan: the more space the squash cubes have (the less crowded they are) the better they roast. When vegetables are overlapping on a sheet pan, they end up steaming instead of roasting. This definitely affects the end taste and texture. I use this 15×21 inch sheet pan and love the results! Also, the bigger the pan, the quicker the squash will roast!
Note 3: Roast the seeds: check out the FAQ section in the post for how to roast butternut squash seeds
Note 4: Calories are for the basic butternut squash.
Nutrition Facts
Serving: 1serving | Calories: 124kcal | Carbohydrates: 21.8g | Protein: 1.9g | Fat: 4.9g | Sodium: 7.5mg | Fiber: 3.7g | Sugar: 4.1g
We do our best to provide accurate nutritional analysis for our recipes. Our nutritional data is calculated using a third-party algorithm and may vary, based on individual cooking styles, measurements, and ingredient sizes. Please use this information for comparison purposes and consult a health professional for nutrition guidance as needed.